Hosting with Vercel
Finally, we're ready to get this app in production. Make sure all the latest changes are pushed up to your repository. These are the steps to getting the create-next-app up and running on Vercel.
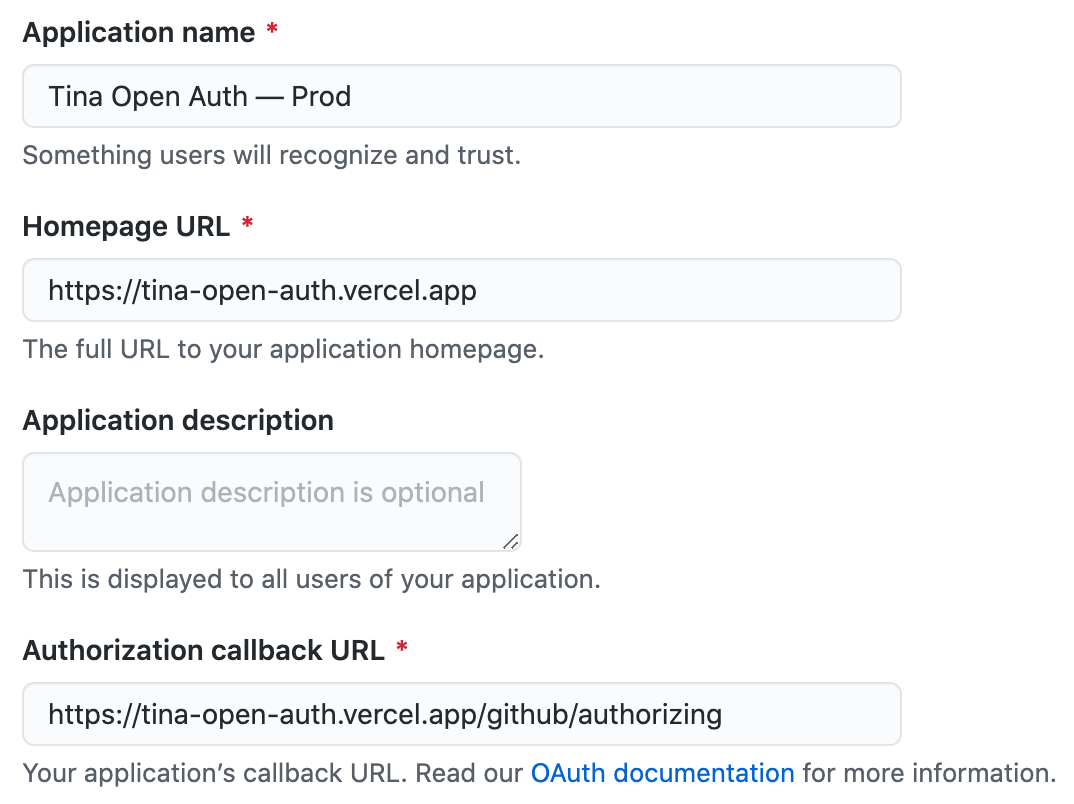
- Create a new GitHub OAuth App pointing to your Vercel deployment instead of localhost. Go back to the OAuth page in your GitHub Developer Settings. Your site will be visible from a generated domain — typically your-site-name.vercel.app — use this as the base URL. This will be the production app, we can add the client id, client secret, and signing key values to our environment variables in Vercel.
- Go to https://vercel.com and signup or login.
- On your dashboard click New Project.
- Under "Import Git Repository", search for or enter the URL of your repository on GitHub, click 'import'.
- If prompted, select the 'scope' (typically this will be 'Personal Account')
- Under the 'Import Project' screen, it will auto-detect that you're using Next.js. The default build, output, and development commands don't need to be changed. However, you can enter the project environment variables and values outlined in your
.envfile, making sure to copy the client id and client secret from the production GitHub App you just created.(Import Repository into Vercel)
- Click "Deploy". Once the build succeeds, your site will be visible from the generated domain (your-site-name.vercel.app). Make sure the domain in the GitHub app matches the one generated by Vercel.
Visit your website, you should now be able to login and edit content with Tina on the live site! 🎉
Go ahead, make some edits and commit the changes (note these will commit and push to master if you own the repo). Toggle between edit and non-edit mode to get a feel for how things work on a live site.
How does this work?
When we deploy with Vercel, we can take full advantage of Preview Mode. This allows us to host a website that is fully static by default but switches to a dynamic mode that runs server code for users that have a special "preview" cookie set.
When someone visits the live site, they will initially land on a static home page. If they click the "Edit this Site" button and authenticate with Github, a fork will be created from which they can commit content edits. Depending on the editing context, the content will render from the static production build or be dynamically sourced from the Working GitHub Repository. You can try this on the demo repository.
In our case, since we are the owner of the repository, any content edits we make on the live site will be committed to master. We encourage you to create a new branch before submitting a new pull request for changes.
Final Notes
That's it! There are quite a few steps but this should be a 0-100 guide on getting up and running with GitHub Open Authoring, using Tina, Next.js & Vercel.
There is still more work to do in order to improve the Open Authoring workflow for teams. Stay tuned with the latest on the GitHub project or with our Newsletter.